This nifty feature is hidden deep inside the settings of your iPhone. It is essentially a feature that can be compared to having a “self destruct” button, but only for the data on your device. However, it is not that any of your family members trying to read your chats might accidentally delete your precious data. The system works in a way that prevents such accidental deletions. As the tech blogger, UI designer, and inventor of the Markdown markup language, John Gruber explained in his post, “After the 5th failed attempt, iOS requires a 1-minute timeout before you can try again. During this timeout, the only thing you can do is place an emergency call to 911. After the 6th attempt, you get a 5-minute timeout. After the 7th, 15 minutes. These timeouts escalate such that it would take over 3 hours to enter 10 incorrect passcodes.”.
How to Set It Up?
So, if you are someone who really needs to protect the data inside your device, then you might want to turn this feature on. And here is how you can do it.
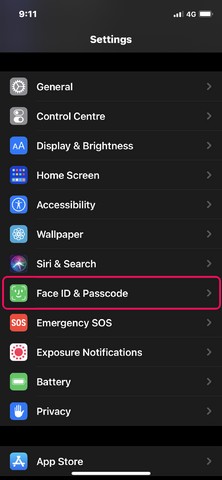
Open “Settings” on your iPhone. Scroll down a bit and tap “FaceID and Passcode” from the list. If you are using a TouchID-enabled device, it would then be “TouchID and Passcode”.
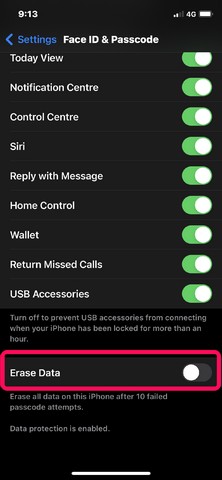
Enter the current passcode of your iPhone to access the settings. Now inside the section, scroll all the way down to find the switch for “Erase Data”.
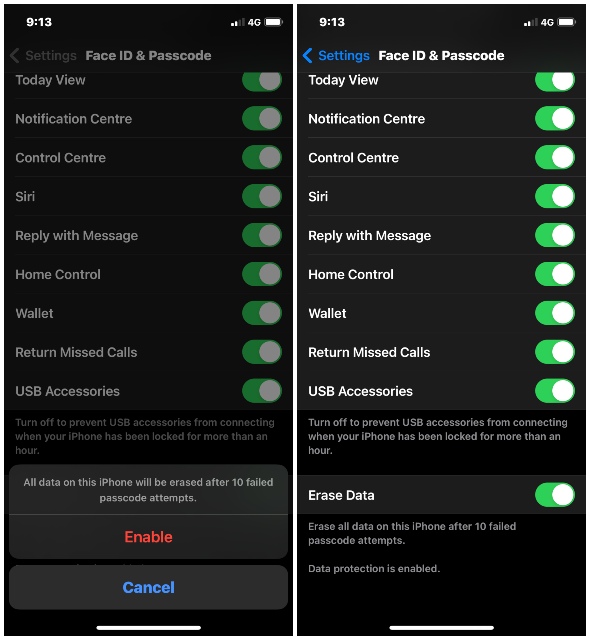
Toggle it on. After confirmation, this feature will become active.
So, next time if someone who does not know your passcode tries to enter your device for private data, they will be erased before he/she gets hold of them. However, keep in mind, this feature simply resets the iPhone to factory settings. So, your data that already exists in your iCloud account is still there. Hence, after you get back the phone after the reset, you can again log in to your iCloud account to restore your data. Easy pezea, chicken cheesy!


